

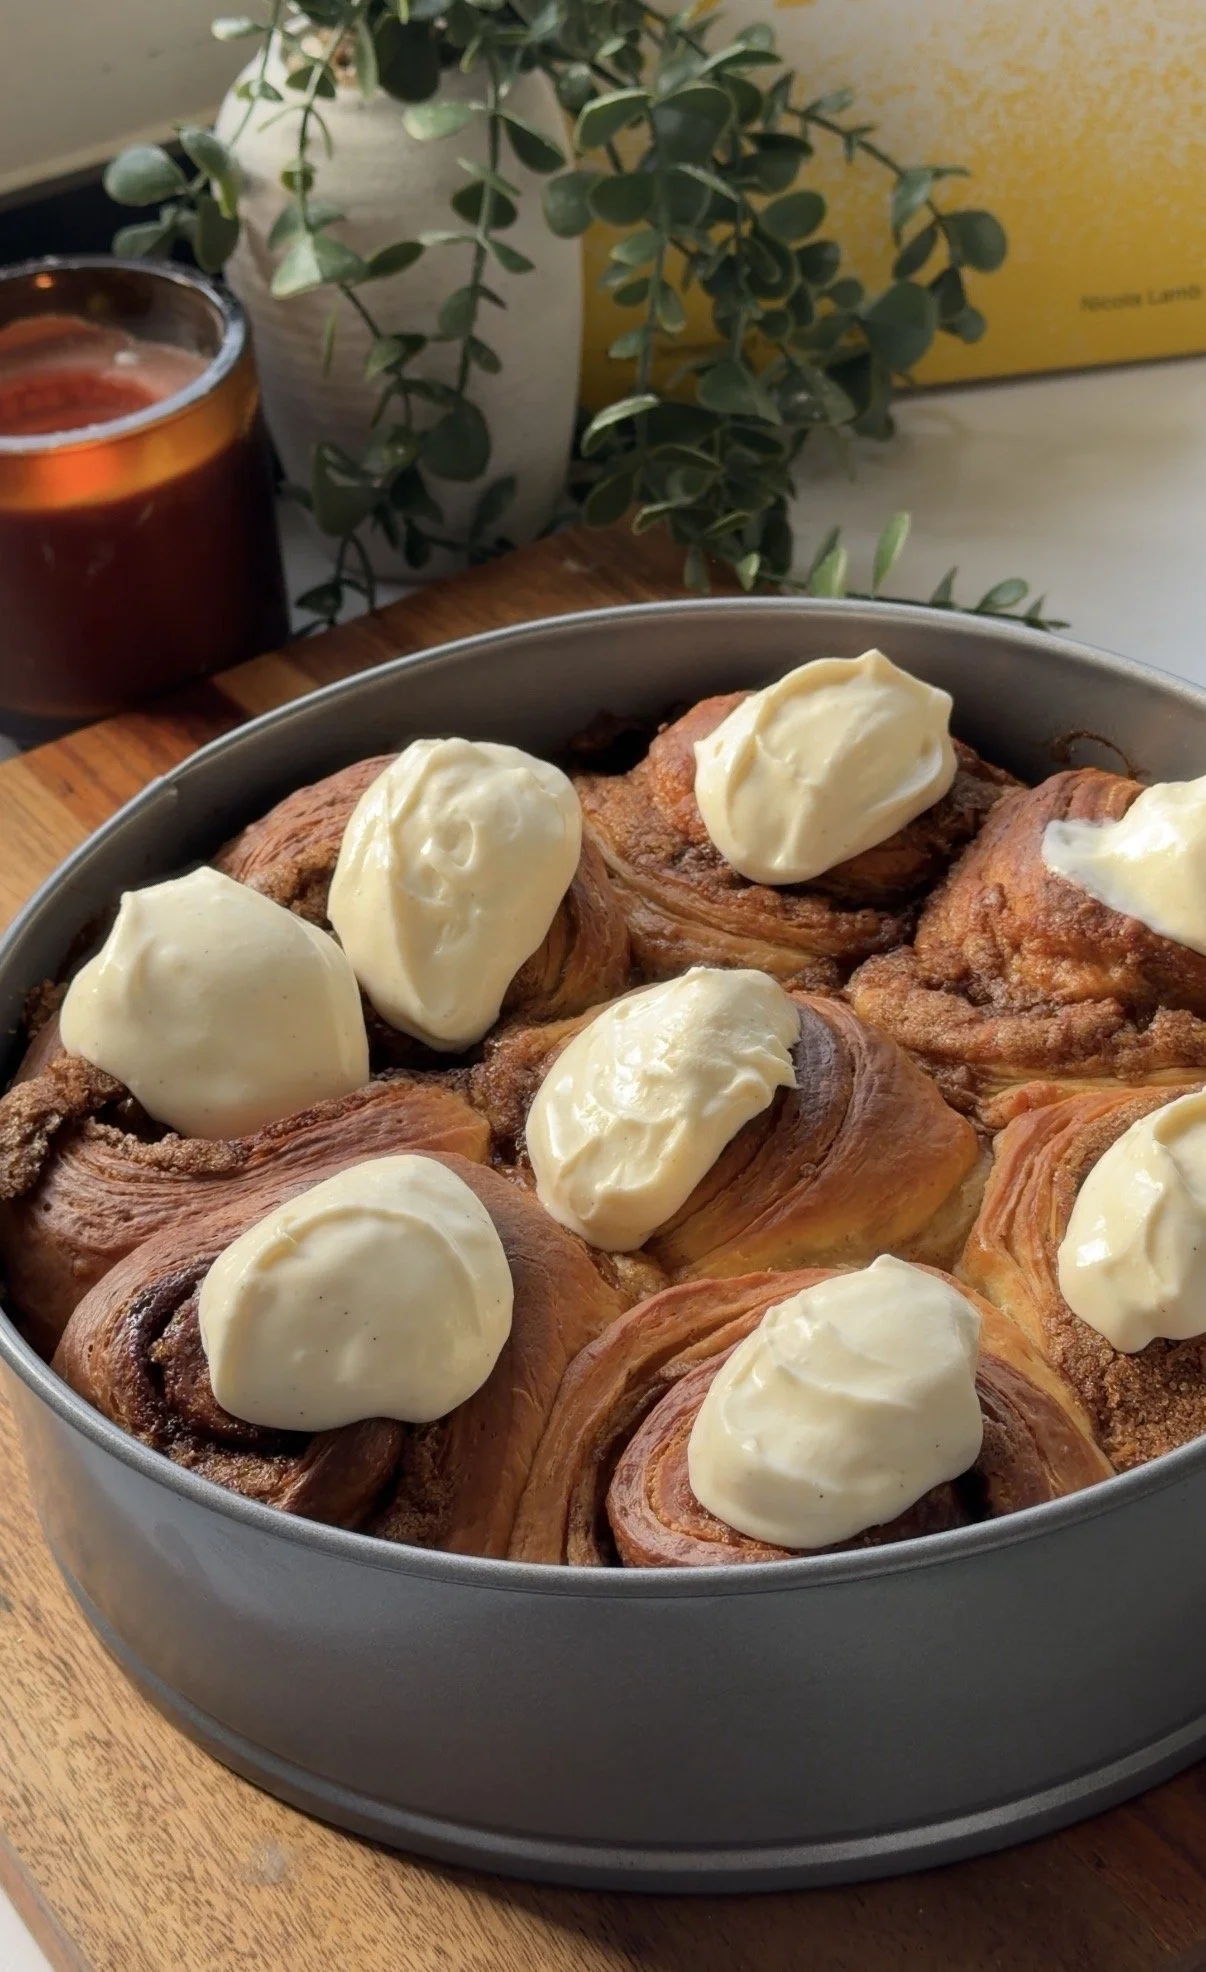
Well, angels, we’ve arrived at the bit of Baking Perfect where I put my money where my mouth is :D
Over the last few episodes (catch up with the series on my TikTok), I’ve been working my way through some of the internet’s most popular cinnamon roll recipes, trying to understand what makes a truly excellent cinnamon roll.
I’ve played about with different flours, different amounts of butter and sugar, different methods of fermentation and, in one case, a saucepan full of cooked flour and milk (a tangzhong, to you and me).
I’ve been taking notes, comparing the formulas using baker’s percentages and paying particular attention to how the various ingredients and techniques influence the finished buns, and I am happy to say I’ve now finally developed my own version to share with you here today. :)
You can scroll straight down for the recipe, but first, let’s revisit our three previous contenders shall we!
What I’ve learned so far
Episode 1: Sally’s Overnight Cinnamon Rolls
We started with Sally’s Overnight Cinnamon Rolls, although I used the same day method she allows for!
It’s quite a straightforward enriched dough, with two rises and the option to refrigerate the shaped rolls overnight.
Sally’s original formula uses either plain flour or bread flour. I plumped for a 50/50 blend of the two.
Looking at the baker’s percentages, the dough contains approximately 20.1% butter and 23.6% sugar against the total flour weight. It’s a pretty rich dough, which definitely helps explain that lovely, soft eating texture.
This was a useful starting point because it gave us a relatively uncomplicated enriched dough to compare the subsequent recipes against. It’s also a good reminder that producing a soft cinnamon roll doesn’t necessarily demand an entire day in the kitchen.
I absolutely loved these and feared we’d peaked too soon!
Episode 2: King Arthur’s Soft Cinnamon Rolls
Next came King Arthur Baking’s Soft Cinnamon Rolls.
These are quite different to our first, and that was the goal. I wanted to try three very different techniques so I knew what I loved! Inspired by Japanese milk bread, these rolls incorporate a tangzhong, which involves cooking some of the recipe’s flour with liquid until the starches gelatinise.
Starch gelatinisation increases the flour’s capacity to bind water, which can give us a softer crumb and help slow that firming that happens naturally as bread ages. Essentially it can help extend the shelf life somewhat.
Another interesting feature is the absence of added sugar in the dough itself. I found these almost savoury, especially when compared with some of the other cinnamon rolls I’ve made. The icing, on the other hand, is VERY sweet, maybe a tad too much for me (I think the absence of cream cheese meant there was nothing to cut through the sugar and butter) but the contrast works quite well.
The tangzhong gave me plenty to think about in terms of moisture retention, but I felt like I wanted a little more balanced sweetness between the roll and the icing, rather than the icing doing all the work.
Episode 3: Well Made by Kiley’s Perfect Classic Cinnamon Rolls
Finally, I tackled Well Made by Kiley’s Perfect Classic Cinnamon Rolls.
And these are quite the indulgent affair!! I absolutely adore Kiley’s recipes, and here she uses either Greek yoghurt or sour cream (I went for the latter) in the dough, a generous amount of butter and sugar, and double cream poured over the shaped rolls immediately before baking for extra goo.
When I compared the formulas, Kiley’s dough came in at approximately 20% sugar and 21% butter, putting it among the richer recipes we’ve tested.
The cultured dairy tang from the sour cream was also very welcome amongst all that richness. Sour cream contains water, milk fat, proteins and organic acids, all of which contribute to the dough’s behaviour during mixing and baking. It also introduces a gentle acidity that I really like alongside the very sweet cinnamon filling.
Of course, more fat doesn’t automatically mean a better cinnamon roll. There’s a point at which richness can begin working against structure, especially if your dough is already heavily enriched.
Which brings me to my own recipe :)
What I’m looking for in a cinnamon roll
After three rounds of cinnamon roll testing, I had a pretty good idea of what I wanted from my own recipe.
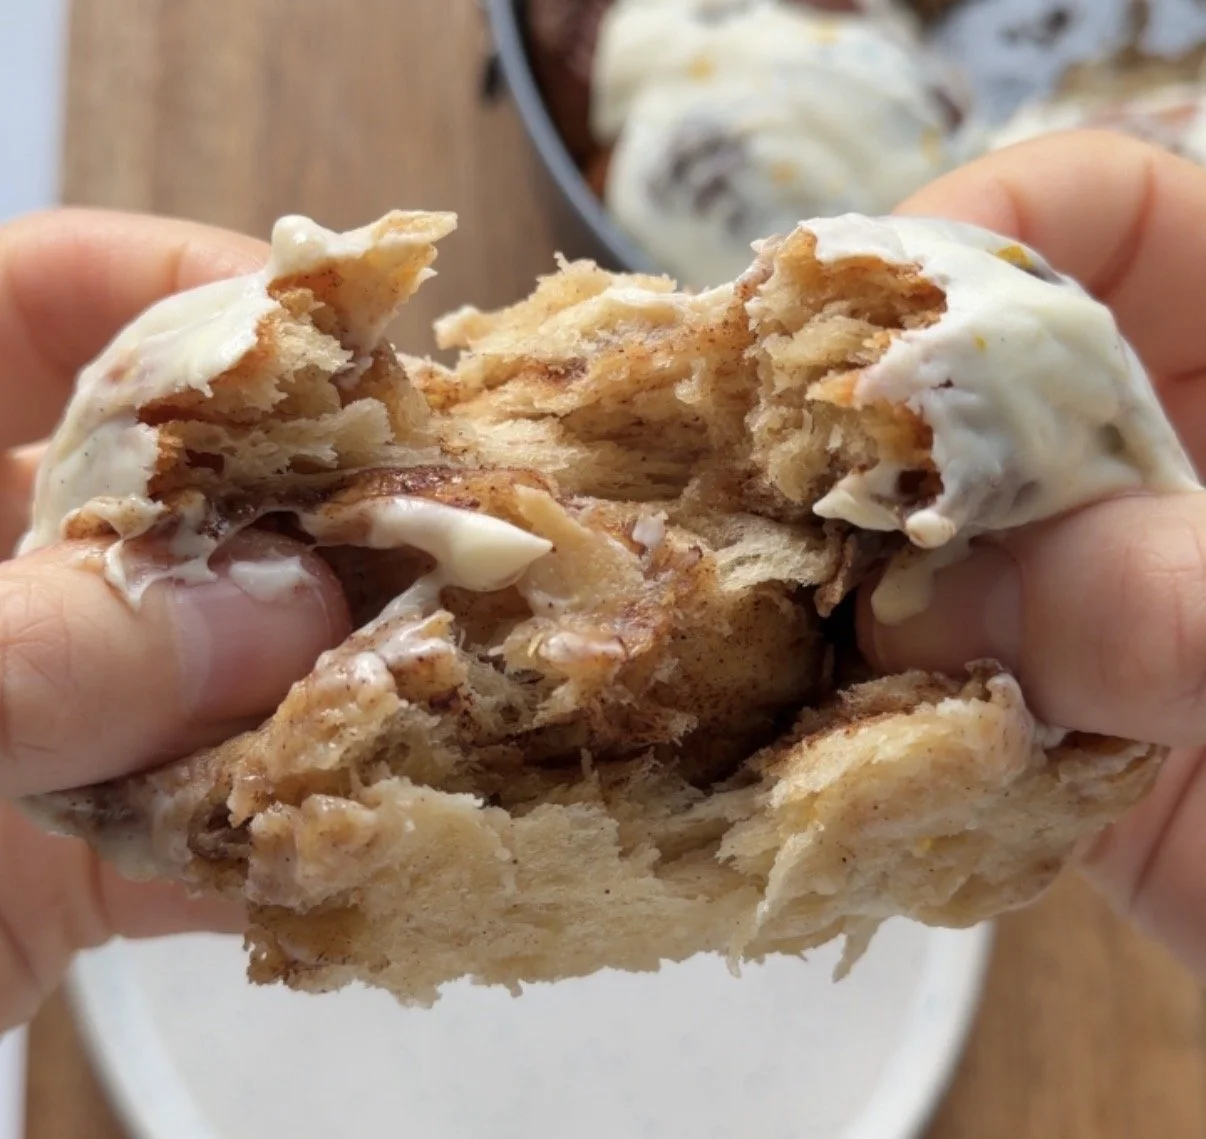
Something soft, pillowy and beautifully pull apart, but with a little bit more going on in the texture department. I’m a gal who likes multiple textures in her bakes, and whilst I adore a soft cinnamon roll, I also have a fondness for the shatteringly crisp, buttery layers of, say, a morning bun.
Can you see where I’m going with this?
SHOCK. I decided to make something that sat somewhere between the two.
Morning buns are often made using laminated pastry, which involves folding butter between layers of dough. As the pastry bakes, moisture turns to steam, helping separate those layers and giving us that lovely flaky texture.
It’s the same broad principle used to make croissants, although morning buns are generally rolled with sugar and spices rather than shaped into crescents, and I do personally find them a lot more forgiving than their fancy French counterparts.
Now, my first attempt at laminating pastry at home was a horrific affair involving homemade ‘croissants’ (barely deserving of the word). They were NOT good.
Undeterred, I tried again, this time with a batch of cinnamon sugar dusted morning buns (I cannot for the life of me remember whose recipe I used, my apologies, twas a long time ago now).
I came to the conclusion that morning buns were infinitely far better suited to me, a beginner baker who was still finding her feet with enriched doughs and pastry.
They were, at least to me, perfect.
I wanted to bring some of that lovely flakiness into my cinnamon rolls, without making the whole undertaking unnecessarily complicated.
I don’t think home lamination is something anyone should be put off trying, but I can totally appreciate that the prospect of manufacturing a perfectly uniform butter block, enclosing it in dough and rolling the whole thing out without butter melting and/ or escaping from every possible orifice isn’t especially appealing when you’re just starting out.
That’s where queen Erin Jeanne McDowell comes in.
I’ve taken inspiration from her Faux-Laminated Maple Brioche Buns and adapted the technique to use frozen grated butter.
No butter blocks, nor any complicated equipment and quite a bit less opportunity for things to go, ahem, tits up.
Grating frozen butter is easier, faster and, provided you work quite quickly, gives us a wee bit more control over the butter’s temperature. I also didn’t see much point in going to the trouble of traditional lamination when we’re ultimately rolling the dough into buns and baking them snugly together in a tin. The layers towards the bottom are going to soften and become less distinct as the buns expand and the buttery cinnamon sugar filling melts into them. It’s really the exposed upper layers I’m interested in getting lovely and crisp. So, rather than spending a ton of time painstakingly laminating the dough, I’ve opted for a much simpler (lazier?!) method that should give us that contrast between soft, pillowy centres and delicate, flaky tops, without quite as much faffing.
I’m not sure I’d recommend this approach for croissants, though TBH it couldn’t make them any worse than my first attempt, but for what we’re trying to achieve here, a soft cinnamon roll with some delicate, flaky layers around the outside, it makes sense.
We’re using four folding stages in total, same as Erins:two book folds and two letter folds. And because the shaped rolls rest in the fridge overnight, much of the recipe is entirely hands off.
There’s a little work involved on the first day, granted, but the reward is beautiful freshly baked cinnamon rolls the following morning.
Now, onto the flavours.
I wanted plenty of cinnamon, obviously, but throughout our previous three recipe tests I found myself desperately craving a little more acidity and zing, so I decided to introduce orange and cardamom into the equation. You can absolutely omit these if they’re not your cup of tea and stick with a more traditional cinnamon sugar filling.
Orange and cardamom make excellent bedfellows. The citrus brings zesty brightness, while cardamom has a slightly floral, eucalyptus like aroma that works gorgeously alongside the warmth of cinnamon (don’t tell my mum, she hates the stuff!).
I’ve sprinkled a mixture of orange zest, cardamom, cinnamon and sugar between the dough layers during each fold, so we’re building flavour directly into the faux lamination as well. Bonus; your house is gonna small HEAVENLY.
Again, if you’d rather omit the cardamom and/or orange, you can just use cinnamon sugar. There’s more of that citrus spiced goodness in the buttery cinnamon filling, too, with a final hit of fresh orange zest grated over the rolls after frosting (entirely optional).
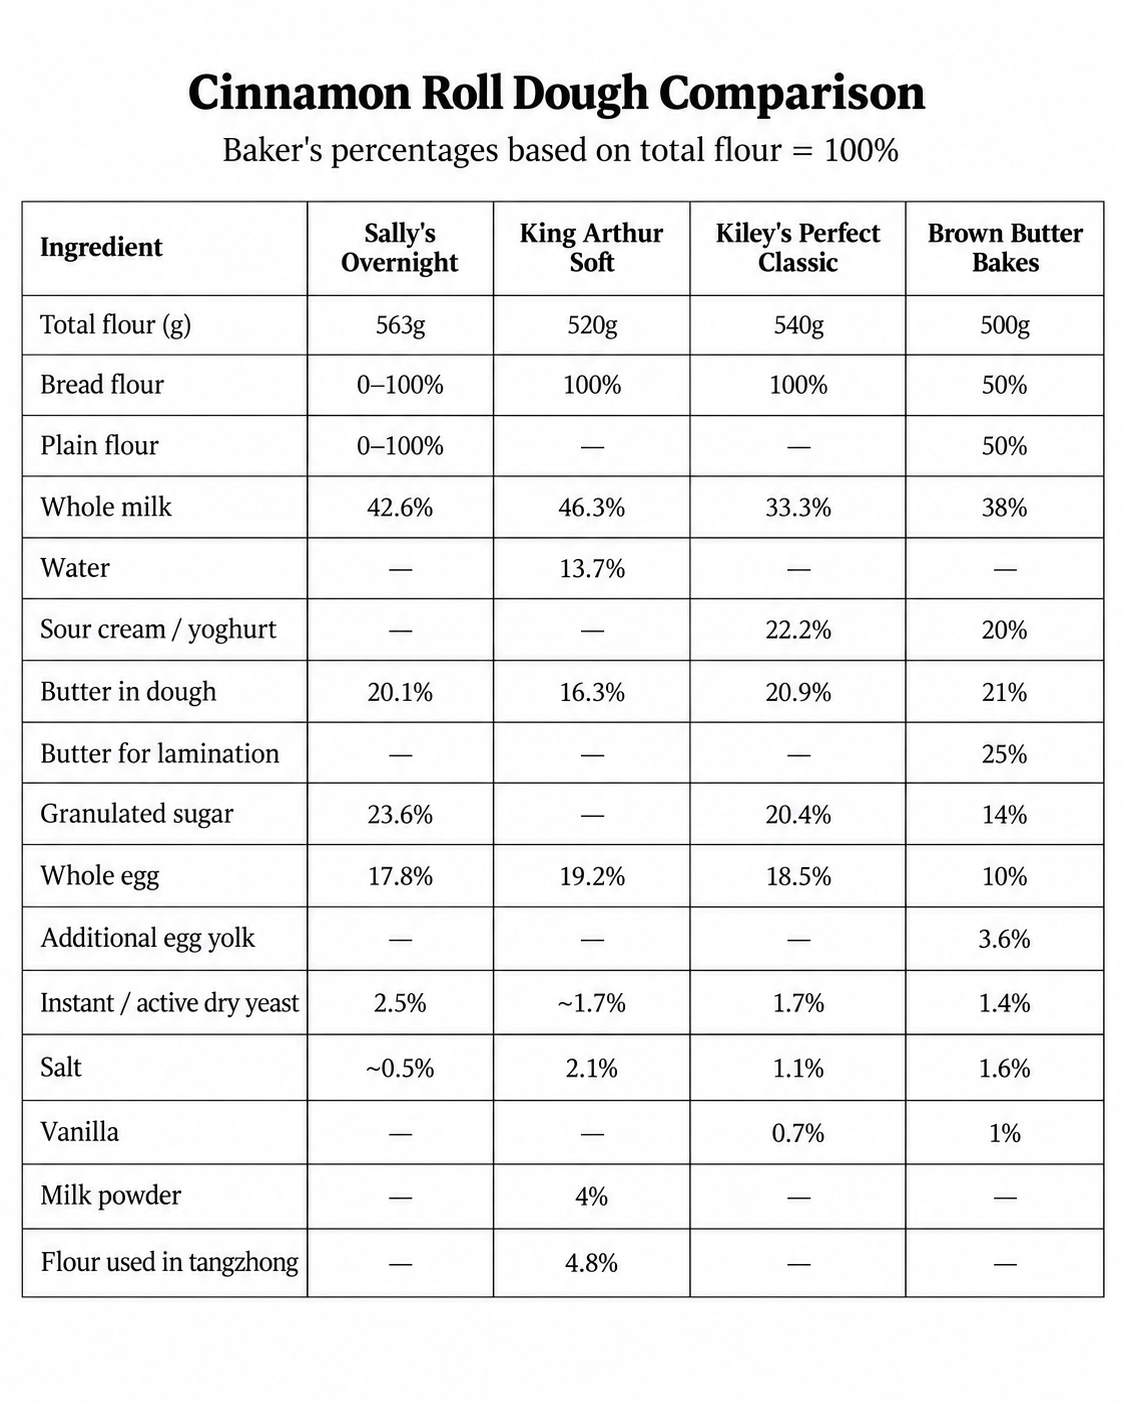
Brown butter was always going to make an appearance obv, I can’t seem to get enough of the stuff but this time I’m incorporating it into the dough itself, replacing the water lost during browning so we can keep those flavours without changing the dough’s hydration too dramatically. Again, if you want to use regular schmegular butter, you’re absolutely fine to do so.
As for the dough itself, I’ve decided against using tangzhong this time. Having explored that technique during our King Arthur cinnamon roll experiment, I was interested in seeing what I could achieve through flour selection, enrichment, fermentation and handling alone.
I’m using a 50/50 blend of bread flour and plain flour, which should give us sufficient gluten forming potential to support the dough while keeping soft pillowyness firmly at the forefront.
I’ve also borrowed a little inspiration from Kiley’s recipe by using a little sour cream, which give us a touch more moisture, fat and a gentle acidity.
So, that’s where we’ve ended up. A hybrid of sorts. An enriched sour cream and brown butter dough, a little faux lamination for those crisp outer layers, a generous citrus-spiced cinnamon filling, and a brown butter, vanilla bean and mascarpone cream cheese frosting.
I am really happy with them. I hope you love them too.
Brown Butter Citrus-Cardamom Croissant Cinnamon Rolls
Yield: 9 generous cinnamon rolls
Tin: Large round or square tin. I used a 26cm round cake tin.
Oven: 170°C conventional / 150°C fan
Recommended schedule: Freeze a half (125g) block of butter. Prepare the dough, laminate, fill and shape on day one. Refrigerate the shaped rolls overnight, then proof if necessary and bake the following morning.
Same-day instructions: Included in the notes.
Baker’s percentages: Calculated against 500g total flour = 100%.
Ingredients with Bakers Percentages
Brown Butter & Sour Cream Dough
250g very strong white bread flour (mine was 14% protein) - 50%
250g plain flour (mine was10% protein) -50%
190g whole milk - 38%
100g full fat sour cream, room temperature - 20%
105g rehydrated brown butter, finished weight - 21%
70g granulated sugar - 14%
1 large egg, room temperature - 10%
1 egg yolk, room temperature - 3.6%
7g instant yeast - 1.4%
8g fine salt - 1.6%
5g vanilla bean paste or extract - 1%
125g frozen unsalted butter, for folding
Butter note: We’ll begin with 150g unsalted butter, brown it, replace the evaporated water and then divide it into 105g for the dough and 45g for the frosting. Both quantities refer to the butter after rehydration.
If you’re not browning your butter, use 105g regular unsalted butter for the dough and 45g for the frosting.
Orange, Cardamom & Cinnamon Sugar
For sprinkling between the lamination folds
100g granulated sugar
2 tsp ground cinnamon (5g)
1 tsp ground cardamom (2g)
1 tsp finely grated orange zest (2g)
Orange, Cardamom & Cinnamon Butter Filling
140g light brown soft sugar
65g unsalted butter, softened (approximately 18–19°C)
1 tbsp ground cinnamon (7–8g)
1 tsp ground cardamom (2g)
1 tsp finely grated orange zest (2g)
¼ tsp fine salt (1–1.5g)
Brown Butter, Vanilla Bean & Mascarpone Cream Cheese Frosting
150g full fat cream cheese, room temp & soft
150g full fat mascarpone, room temp & soft
45g rehydrated brown butter, finished weight, room temp & soft
65g icing sugar, sifted
5g vanilla bean paste
1g fine salt
Optional finishing ingredients:
A little additional granulated sugar (approximately 5–10g) for the bottom of the tin
Freshly grated orange zest
For the frosting, allow the cream cheese, mascarpone and butter to come to the same temp so they come together without clumping.
Method
Day One: Make, Laminate & Shape
Step 1 - Brown and rehydrate the butter
Begin with 150g unsalted butter.
Place it in a light-coloured saucepan over medium heat and allow it to melt.
Continue cooking, stirring or swirling the pan regularly.
The butter will foam as its water begins to evaporate. As the bubbling subsides, the milk solids will begin to brown and the butter will develop that gorgeous nutty aroma.
Once the milk solids are golden amber, immediately transfer the butter into a heatproof bowl, making sure to retain all those browned bits.
Allow it to cool until no longer extremely hot, then weigh the butter, including the browned milk solids.
Gradually add back enough water to restore the total weight to 150g, stirring or whisking as you go.
Set aside:
105g for the dough
45g for the frosting
The butter for the dough needs to be the consistency of softened butter when we add it, so you may need to refrigerate it briefly until it firms up, then allow it to soften slightly again.
Keep the frosting portion covered until needed.
Step 2 - Mix the dough
In a heatproof jug, gently warm the milk in the microwave until it reaches approximately 40-42°C.
Stir in the instant yeast and a teaspoon of the granulated sugar.
Leave for five minutes while you prepare the other ingredients.
Instant yeast doesn’t actually need activating beforehand, I do it out of habit! So you can also add it directly to the flour if you really cant be bothered. Don’t worry if your mixture doesn’t produce dramatic foam after five minutes.
In the bowl of a stand mixer fitted with the dough hook, combine:
Both flours
Remaining granulated sugar
Milk and yeast mixture
Sour cream
Whole egg and egg yolk
Salt
Vanilla bean paste
Mix on a low speed until the ingredients come together into a rough dough.
Cover and allow the dough to rest for five minutes so the flour can begin hydrating.
Continue kneading for approximately 10 minutes, until the dough looks smoother and has developed some elasticity.
Gradually introduce the softened, rehydrated brown butter in several additions, approximately a tablespoon at a time, allowing each addition to become incorporated before adding more.
It might look a bit greasy and weird at first, but don’t panic. It should come together.
Once all the butter has been added, continue kneading for approximately five minutes, or until the dough is smooth, elastic and bouncy.
It shouldn’t feel greasy. We’re looking for a dough that’s soft and slightly tacky but manageable.
You should be able to stretch a small piece into a thin membrane before it tears (the windowpane test), although a perfectly translucent windowpane isn’t essential.
Don’t rush the mixing. Fat can interfere with gluten development, and properly developing the dough will help it support the filling, folding and final rise.
Step 3 - First fermentation
Transfer the dough to a lightly greased bowl and cover.
Leave somewhere warm (around 24°C) for around 60–90 minutes, until it has increased in volume by around 50–75%.
Once the dough has risen, gently punch it down to release the excess gas.
We’re now going straight into our faux lamination.
If the dough feels particularly warm or soft, pop it into the fridge for 20 minutes before continuing.
We want it cool enough to handle without melting our frozen butter.
Step 4 - Faux laminate the dough
This is where we create our delicate buttery layers!
We’re going to use four folding stages in total, alternating between two techniques:
Book fold (4-fold)
Letter fold (3-fold)
Book fold (4-fold)
Letter fold (3-fold)
If you haven’t laminated dough before, refer to the accompanying folding illustrations below as you work!
Prepare the butter and sugar
Make sure your 125g unsalted butter is thoroughly frozen.
Mix together the granulated sugar, cinnamon, cardamom and orange zest in a small bowl.
We’ll also use a quarter of the sugar, and a quarter of the frozen butter (31–32g) for each folding stage.
Keep any butter you’re not currently using in the freezer.
Fold 1 - Book fold (4-fold)
Transfer the dough to a lightly floured work surface.
Roll it into a rectangle approximately 40 × 30cm, aiming for a thickness of around 1–1.5cm. Don’t worry if your measurements aren’t exact; an even thickness is more important.
Using the coarse side of a box grater, grate approximately one-quarter of the frozen butter evenly over the dough, leaving a narrow border around the edges.
Sprinkle one quarter of the citrus spiced sugar evenly over the surface.
Now perform your book fold.
Position the dough so one long side is facing you.
Fold the left edge towards the centre, bringing it approximately three-quarters of the way across the dough.
Fold the right edge inwards so it meets the first folded edge. You should now have an off-centre seam, kinda like an open book.
Fold the dough in half along that seam, bringing the larger section over the smaller section to close the book.
Wrap the dough and refrigerate for 15–20 minutes if it feels soft or the butter is beginning to warm.
Fold 2 - Letter fold (3-fold)
Return the dough to your lightly floured work surface.
Rotate it 90 degrees and gently roll it back out into a rectangle approximately 1–1.5cm thick.
Grate another quarter of the frozen butter evenly over the dough and sprinkle with another quarter of the citrus spiced sugar.
Now perform your letter fold.
Mentally divide the dough into three equal sections.
Fold one outer third over the centre section.
Fold the opposite third over the top, just as you might fold a letter.
Wrap the dough tightly in cling film and refrigerate for 15-20 minutes, or until the butter has firmed up again.
Folds 3 and 4 - Repeat
Repeat the same sequence once more:
Fold 3: Roll out, grate over the third portion of butter, sprinkle with the third portion of spiced sugar and complete another book fold.
Fold 4: Rotate and roll out again, grate over the remaining butter, add the remaining spiced sugar and complete a final letter fold.
If the dough becomes soft or warm between these stages, refrigerate it for another 15–20 minutes before continuing.
Once all four folding stages are complete, wrap the dough in cling film and refrigerate for 15-20 minutes, or until firm enough to roll and shape.
A note on temperature: We want the butter to remain solid throughout this process. If the dough becomes warm or sticky, or starts resisting the rolling pin, wrap it and refrigerate until firm again.
Don’t force the dough to stretch if it’s resisting. A little patience will make it considerably easier to work with and help prevent the butter from smearing into the dough.
Step 5 - Prepare the citrus cardamom cinnamon butter filling
Place the light brown sugar and orange zest in a mixing bowl.
Rub them together with your fingertips until the sugar becomes fragrant and the zest is evenly distributed.
This helps release the aromatic oils from the orange peel.
Add the cinnamon, ground cardamom and salt, mixing thoroughly.
Finally, incorporate the softened butter to form a spreadable paste.
The butter should be soft, but not melted.
Set aside while you prepare the dough.
Step 6 - Roll and shape
Remove the chilled dough from the fridge and lightly grease your 26cm round tin (or a similarly sized square tin).
If you’d like a little additional caramelisation underneath the rolls, sprinkle a teaspoon or two of granulated sugar evenly across the bottom of the greased tin.
On a lightly floured work surface, gently roll the dough into an approximately 30 × 45cm rectangle.
If the dough resists rolling, allow it to rest for five minutes before continuing. If the butter begins to soften, return it to the fridge instead.
Spread the cinnamon butter filling evenly across the surface, leaving a narrow border around the edges.
With one of the long sides facing you, use a sharp knife or pizza cutter to slice the dough into nine equal strips.
Each strip should be around 2 inches wide if you’ve rolled the dough to the dimensions above.
Roll each strip up into a spiral, keeping it snug without squashing the layers.
Tuck the loose end underneath each bun and arrange them in your prepared tin, cut-side up.
Leave a little space between the rolls to allow for expansion during the final proof.
Step 7 - Overnight refrigeration
Cover the shaped rolls well with cling film or a reusable cover and transfer them directly to the refrigerator.
Refrigerate overnight, ideally for no longer than 8–12 hours.
The dough will continue fermenting as it cools, albeit at a slower rate.
The rolls may look noticeably puffier by morning. That’s perfectly normal!
Come morning, we’re almost ready to bake.
If you’d prefer to make these on the same day, skip the overnight refrigeration and proceed to the final proof once the buns have been shaped. Full notes below.
Day Two: Proof, Bake & Frost
Step 8 - Check the final proof
Remove the cinnamon rolls from the fridge and assess how much they’ve risen overnight.
If they’re already beautifully puffy, expanded and beginning to touch one another, they may need very little additional proofing before baking.
If they’re still relatively firm and haven’t expanded sufficiently, leave them covered at a cool room temperature until noticeably aerated.
Depending on their progress overnight, this could take anywhere from approximately 30 minutes to a couple of hours.
Go by the dough rather than the clock.
The rolls should look plump and feel light, with a gentle indentation springing back slowly.
Don’t prove them anywhere excessively warm. We don’t want the butter between those carefully created layers to melt before the buns reach the oven.
Towards the end of the proof, preheat your oven to 170°C conventional / 150°C fan.
Step 9 - Bake
Once the rolls have completed their final proof, transfer them to the preheated oven.
Bake for approximately 40–50 minutes, checking towards the end of the baking time.
If the tops are browning too quickly, tent them loosely with foil.
The tops should be beautifully golden, with the exposed outer layers beginning to crisp and flake, and the centres properly baked.
For additional reassurance, check the internal temperature in the dough portion of a central roll. Approximately 86–93°C is a useful guide, although temperature isn’t the only indicator of doneness. Pull them closer to 86 if you like them soft and gooey, closer to 93 for a little more done.
Be careful not to place the probe directly into the molten filling, as it won’t provide a reliable reading of the bread itself!
Remove the buns from the oven and allow them to cool for approximately 10–15 minutes before frosting.
If you’ve used sugar in the bottom of the tin, be mindful that the caramelised sugar will be extremely hot.
Brown Butter, Vanilla Bean & Mascarpone Cream Cheese Frosting
Step 10 - Prepare the frosting
Whilst the buns cool slightly, combine the sifted icing sugar with the softened, rehydrated brown butter (or regular butter), stirring until smooth.
You can do this by hand or with an electric mixer.
Add the cream cheese, mascarpone, vanilla bean paste and fine salt.
Mix briefly until evenly combined, smooth and spreadable.
Avoid overmixing, as both cream cheese and mascarpone can become loose and a bit grainy when worked too much.
If needed, chill briefly in the fridge to help the frosting firm up.
Step 11 - Frost the rolls
Once the cinnamon rolls have cooled slightly but are still warm, spread the frosting generously across their surfaces.
If you’d like to preserve more of their crisp outer layers, allow them to cool a little further before frosting, or serve some of the frosting alongside.
Finish with a little freshly grated orange zest, if you fancy.
And there we have it!
Brown Butter, Orange & Cardamom Cinnamon Rolls. Or croissant cinnamon rolls. Or cinnamon morning buns.
Call them what you will, I hope you’ll agree theyre damn delicious.
A Few Recipe Development Notes, FAQs & Troubleshooting
Can I make these on the same day?
Absolutely!
The overnight rest is convenient rather than essential, though I do recommend it if you have the time.
For same day baking, follow the recipe through the initial fermentation.
If the dough is a little warm or soft, chill it for approximately 20–30 minutes in the fridge before beginning the folding process.
Continue with all four folds as instructed, refrigerating between stages as necessary to keep the butter firm.
Once you’ve completed the final fold, chill the dough, prepare the filling and shape the buns.
Instead of transferring the shaped buns to the fridge overnight, cover them and allow them to complete their final proof at a cool room temperature, ideally around 23–25°C.
This may take around 45–90 minutes or longer, depending on the temperature of your dough and kitchen.
The important thing is to judge the buns by how they look and feel rather than relying entirely on the clock.
Once they’re noticeably puffy and aerated, bake as instructed.
Don’t skip the chilling periods during lamination. They’re important for keeping the butter firm and maintaining separation between the layers.
The whole process will still take several hours, but there’s no reason you can’t have freshly baked buns on the table the same day!
Why have you rehydrated the brown butter?
Butter naturally contains water, milk fat and a small quantity of milk solids.
During browning, quite a bit of that water evaporates while the milk solids undergo browning reactions, creating the characteristic toasted, nutty flavour.
If we simply replace ordinary butter gram for gram with brown butter, we’re changing the amount of water and fat entering the dough.
By weighing the butter before browning and then adding back the water lost during cooking, we can account for that moisture loss.
This doesn’t perfectly recreate the original butter emulsion, but it helps us maintain a more consistent ingredient composition.
If you don’t want to brown your butter, you can simply use regular unsalted butter in the same finished quantities.
Why use both bread flour and plain flour?
Bread flour generally contains more protein than plain flour, giving it greater gluten forming potential.
Gluten provides the structure that allows our dough to stretch and retain gas during fermentation.
However, we’re not necessarily looking for the strongest, chewiest dough possible.
We want something that can withstand rolling and folding while retaining a lovely, tender crumb.
That’s why I’ve opted for a 50/50 blend. I just didn’t love the structure of a wholly bread flour dough - of course, if you do, please use 100% bread flour! They will work just as well, just be a little less pillowy.
The exact result will depend on the protein content and absorption properties of the flours you’re using, which is why I’ve included the approximate protein percentages in the ingredient list.
Can I leave out the orange and cardamom?
Of course!
I adore the combination, but if you’re after a more traditional cinnamon roll, you can absolutely omit the orange zest and cardamom.
For the sugar sprinkled between the folds, simply combine the granulated sugar with the cinnamon.
Do the same for the buttery filling, leaving out the orange zest and ground cardamom.
The dough and folding technique can remain unchanged.
What if my dough seems too dry?
Flour absorption varies, and sour cream doesn’t have an entirely standardised composition between brands.
If the dough remains excessively firm after several minutes of mixing, add a little milk, approximately 5g at a time.
Don’t immediately add more liquid simply because the dough looks rough during the first minute of mixing.
Give the flour time to hydrate and the gluten time to develop.
Equally, avoid adding unnecessary flour to correct a dough that’s simply tacky. Enriched doughs are often softer than conventional bread dough.
What if the dough keeps shrinking when I roll it?
That’s usually a sign that the gluten is resisting stretching.
Rather than forcing the dough with your rolling pin, cover it and allow it to rest on the counter or in the fridge if your home is very warm, for 10–20 minutes.
Once the gluten has relaxed, the dough should be easier to roll.
What if the butter starts melting during folding?
Stop and refrigerate the dough.
We want the butter to remain sufficiently firm to stay between the dough layers rather than becoming completely incorporated into them.
If the dough starts feeling greasy, sticky or unusually soft, wrap it and refrigerate until it’s cool and manageable again.
Keeping the rolling pin and work surface cool can help, too.
What if the butter leaks out during baking?
Some bubbling butter and cinnamon sugar around the buns is normal with this kind of recipe.
We’ve got butter in the dough, butter between the folds and butter in the filling.
A little caramelisation around the edges is lovely.
However, if you end up with a substantial pool of separated fat in the bottom of the tin, it could indicate that the butter became too warm during lamination or proofing, that the layers weren’t sufficiently enclosed, or simply that the formula contains more butter than the dough can comfortably accommodate.
Keeping everything cool during folding and allowing the buns to complete their final proof without excessive warmth will help.
How should I store them?
These are at their best on the day they’re baked, particularly if you want to enjoy those crisp outer layers.
Because the frosting contains cream cheese and mascarpone, refrigerate any frosted leftovers promptly in a covered container.
For best quality, enjoy within 2–3 days.
You can gently rewarm individual buns in the microwave, although the frosting will soften considerably.
For freezing, I’d recommend freezing the buns without frosting, then defrosting, reheating and adding freshly prepared frosting when ready to serve.
One last thing
If you’ve been following along with Sally, King Arthur and Kiley, thank you for joining me on this little cinnamon roll adventure.
I hope you’ve learned something useful about enriched doughs, fermentation, flour selection and the many different ways we can approach what appears, at first glance, to be a relatively simple bake.
I’ve certainly learned plenty, and I hope you feel a little more confident about experimenting with recipes yourself.
You can find the previous Baking Perfect episodes on my TikTok and YouTube, along with more recipes, baking science and longer reads over on Substack.
Happy baking, my angels!
Ruby x
Brown Butter Bakes
www.brownbutterbakes.uk
TikTok: @brownbutterbakesleeds
Instagram: @brownbutterbake